Building a Real-Time IoT Pipeline: [Raspberry Pi + DHT22] + [AWS IoT Core + DynamoDB]
Introduction
This post documents my end-to-end journey building a real-time IoT data pipeline from scratch.
From my prior post, I stated that I will start a side project with a topic related to OT-IT convergence, and utilizing cloud features.
I bought the hardware (Raspberry Pi), bought sensors for collecting live data(DHT22), and permanently stored the data in AWS cloud. If you're interested in IoT, cloud engineering, or just want a hands-on AWS project for your portfolio, this is a great starting point for gaining experience and learning new skills.
Sharing my current result: a Raspberry Pi 5 reads temperature and humidity from a DHT22 sensor every 60 seconds, sends the data to AWS IoT Core over a secure MQTT/TLS connection, and stores it in DynamoDB automatically. The automation was done by Python scripts.
Part 1: Buying the Hardware
The first step was simple. I ordered from "Device Mart (디바이스마트, https://www.devicemart.co.kr/main/index)":
- Raspberry Pi 5 (8GB)
- DHT22 temperature & humidity sensor (AM2302)
What I didn't anticipate was that these two components alone weren't enough. When the parts arrived, I quickly realized that I needed additional electronics to actually wire everything together.
What I ended up buying additionally:
- Breadboard: for prototyping without soldering
- 10kΩ resistor: required as a pull-up resistor for the DHT22 data line
- Male-to-Female (M-F) jumper wires: to connect the Pi's GPIO pins to the breadboard
- Female-to-Female (F-F) jumper wires: just in case of wire length issues
These were all easily bought from Coupang(쿠팡) and arrived quickly.
I think what I made is a common beginner mistake. One should always check what supporting components a sensor needs before ordering. However, the decision and arrival of the electronics were fast, for which I can conclude the response solution was quick and adequate.
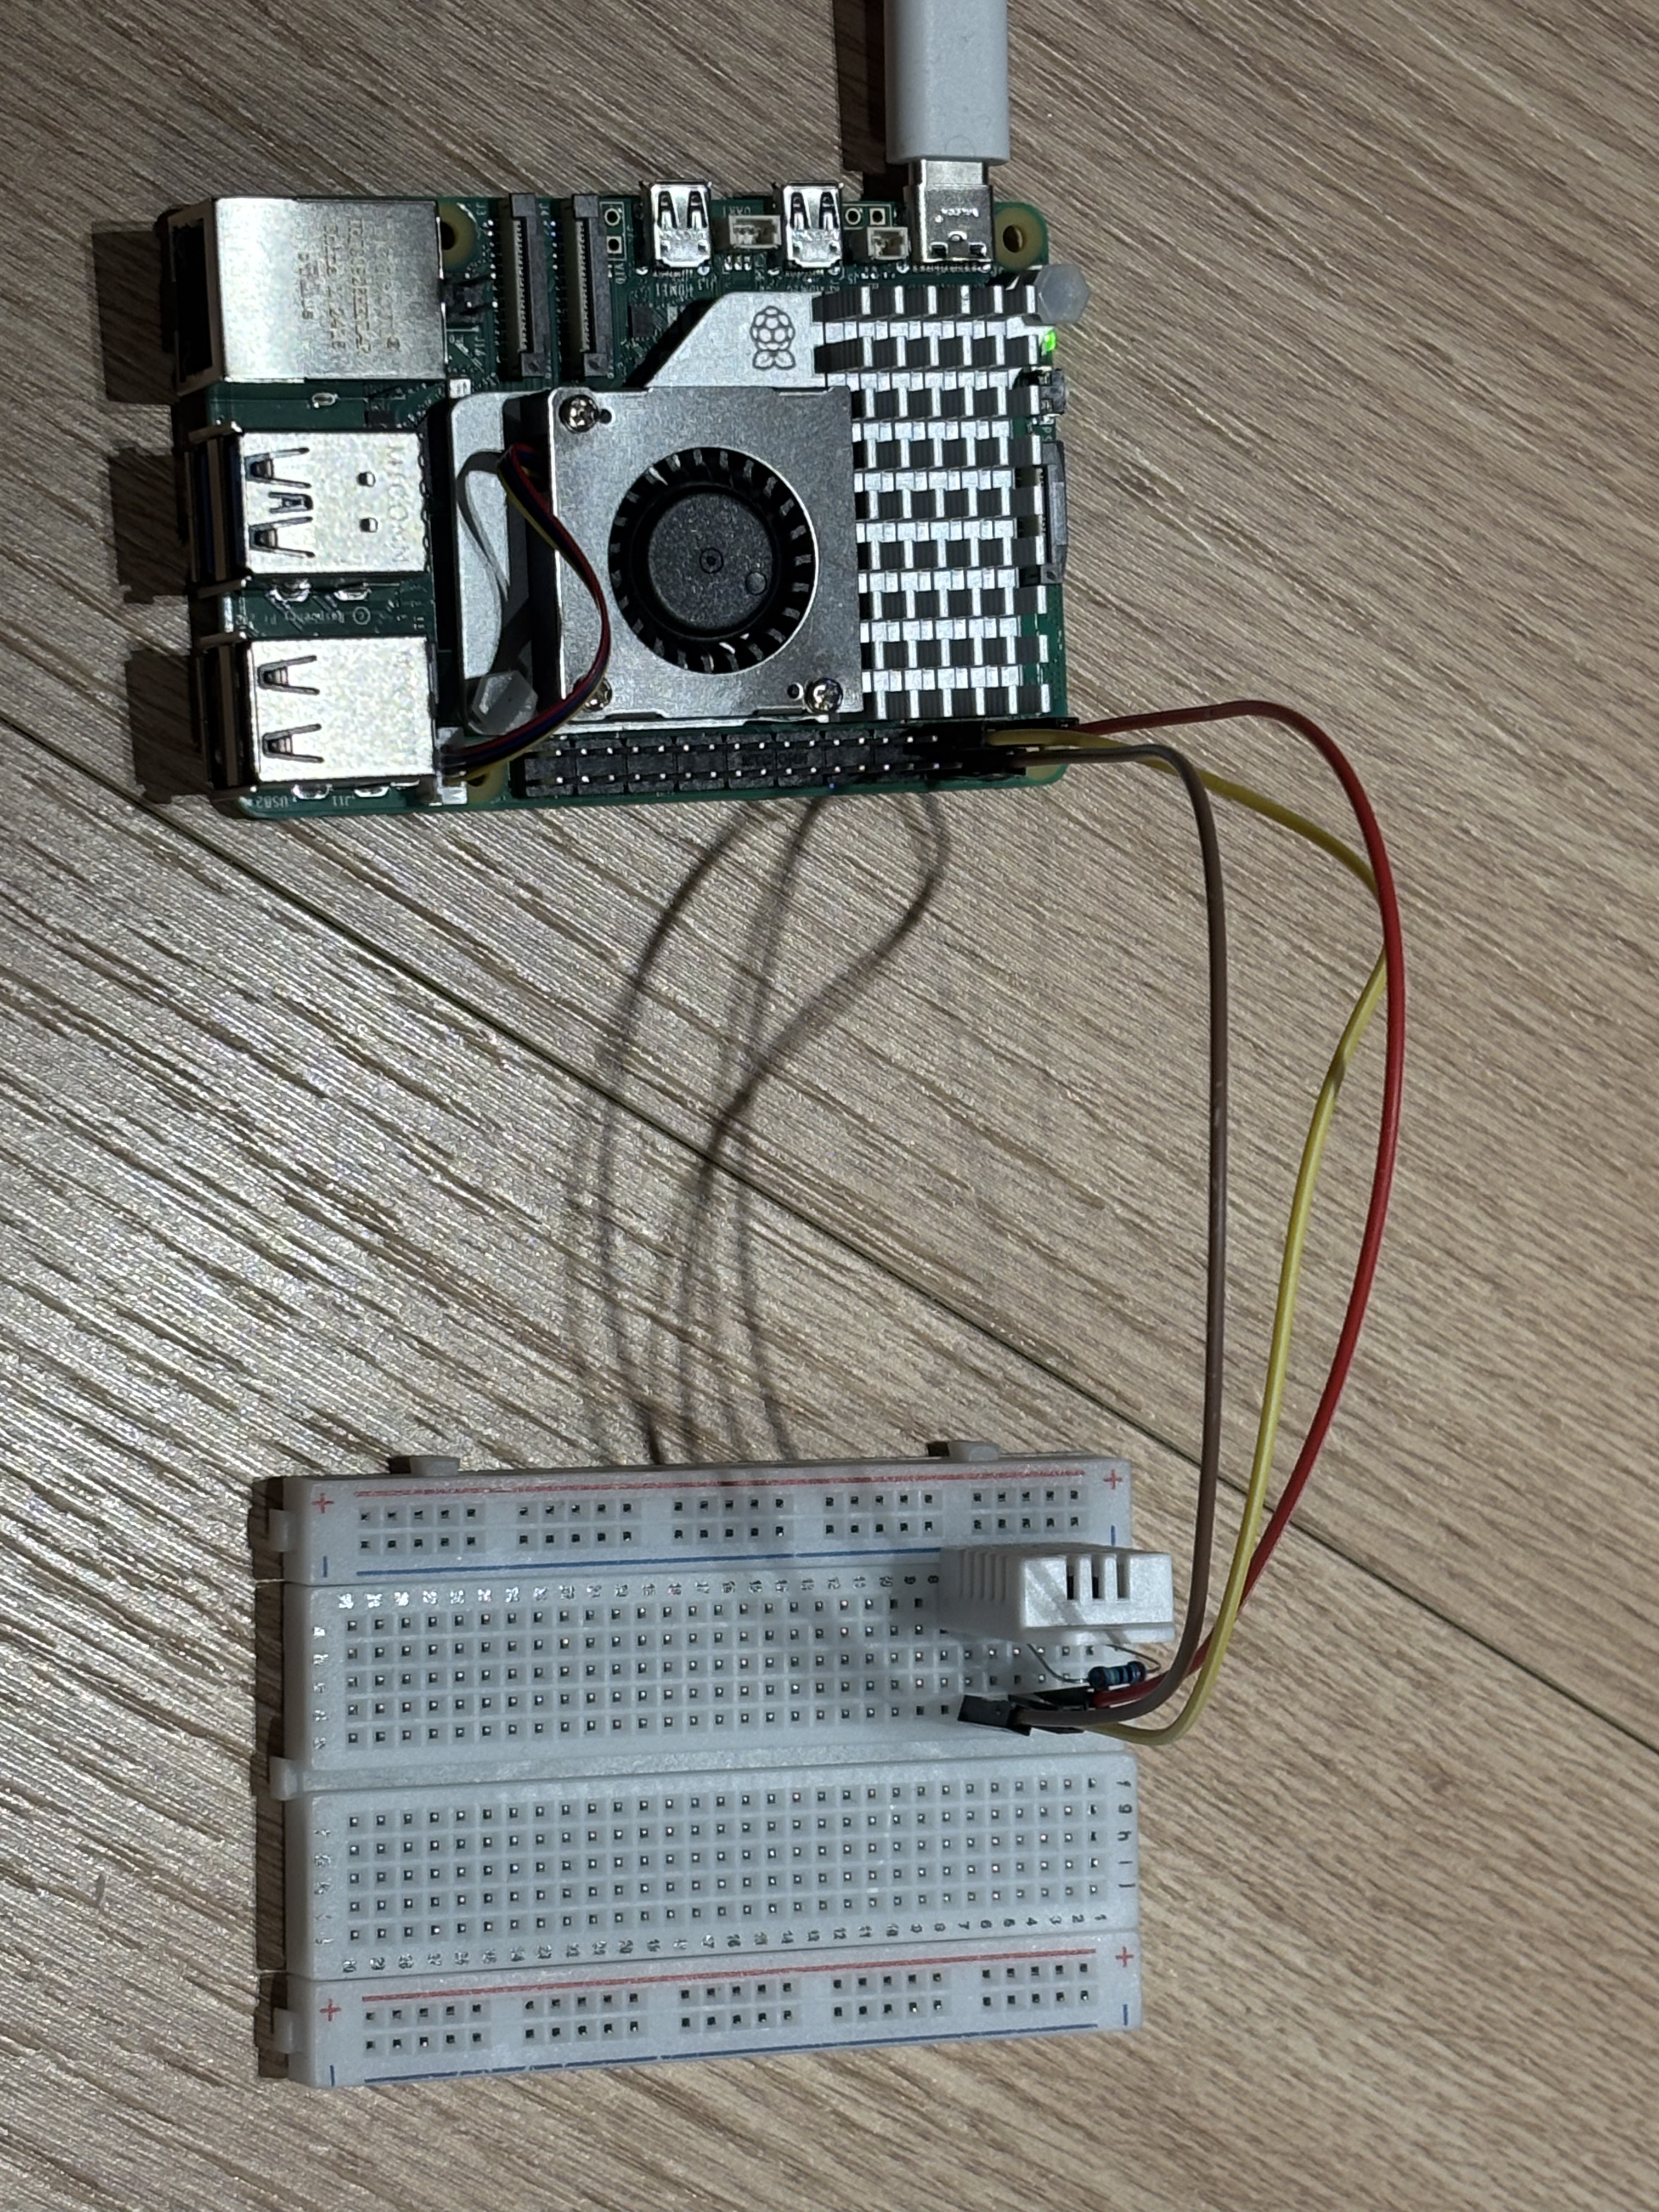
Part 2: Wiring the DHT22 to the Raspberry Pi
The DHT22 I bought was the bare 4-pin version (not the breakout board), which meant I needed the 10kΩ pull-up resistor. The resistor ensures the data line properly returns to a HIGH state between readings. Without it, the readings become unreliable or fail entirely.
When using the 3-pin DHT22 sensor with the breakout board, it already has the resistor built in which doesn't require any additional resistors just like this step.
Here's the wiring I used, referencing the Raspberry Pi GPIO datasheet:

Raspberry Pi 5 --- DHT22
3.3V --- Pin 1 (VCC)
3.3V --[10k ohm] -- Pin 2 (DATA)
GPI04 --- Pin 2 (DATA)
---- Pin 3 (NC - not connected)
GND --- Pin 4 (GND - ground)
Part 3: Connecting to the Raspberry Pi via SSH
[I received assistance from Claude for coding, downloading adequate patches/extensions and writing python scripts]
Rather than connecting a monitor and keyboard to the Pi(for which I have to buy additionally), I accessed it remotely from my Mac using SSH.
First, I used the Raspberry Pi Imager software for configuring the rPi, downloaded the OS to a micro SD card, and then installed the SD card into the rPi5 for a start.

Next, I found the Pi's hostname(which I set up), then connected from my Mac terminal:
ssh kpark30525@kmpark.local
Once connected, the terminal prompt changed to confirm I was inside the Pi:
kpark30525@kmpark:~ $
From here, all commands run on the Pi remotely.
Part 4: Setting Up the Python Virtual Environment
Before writing any code, I created a Python virtual environment(venv) inside the project folder:
mkdir ~/iot-project
cd ~/iot-project
python3 -m venv venv
source venv/bin/activate
Why use a virtual environment?
The Raspberry Pi runs Raspberry Pi OS, which has its own system Python with pre-installed packages. If new packages are installed directly, there is a risk of version conflicts that can break OS-level tools.
A virtual environment creates an isolated Python installation just for the project. Packages installed inside it don't affect anything else on the system. It also makes your project reproducible; anyone can clone your repo and recreate the exact same environment.
Once activated, the terminal prompt shows (venv) to confirm it's active:
(venv) kpark30525@kmpark:~/iot-project $
Important: The venv resets every time you SSH into the Pi. Always run source ~/iot-project/venv/bin/activate first before working on the project.
Installing the required libraries:
pip install adafruit-circuitpython-dht
Part 5: Writing and Testing the Sensor Script
I created a simple Python script test_sensor.py to verify the sensor was wired correctly and returning valid readings:
import board
import adafruit_dht
import time

dhtDevice = adafruit_dht.DHT22(board.D4)

while True:
    temperature = dhtDevice.temperature
    humidity = dhtDevice.humidity
    print(f"Temperature: {temperature:.1f}°C  Humidity: {humidity:.1f}%")
    time.sleep(2)
Running it:
python3 test_sensor.py
Output:
Temperature: 22.6°C Humidity: 32.5%
The sensor was working. ✅
Part 6: Setting Up AWS IoT Core
With the sensor confirmed working, the next step was connecting it to AWS. I used AWS IoT Core which is AWS's service for connecting IoT devices to the cloud.
Creating an IoT Thing
In the AWS Console (region: ap-northeast-2 / Seoul), I navigated to:
IoT Core → Manage → All devices → Things → Create things
- Thing name: rpi-dht22-seoul-001
- Certificate: Auto-generated
Creating an IoT Policy
The policy defines what the device is allowed to do. I used a least-privilege policy, which is only granting exactly what's needed:
{
  "Version": "2012-10-17",
  "Statement": [
    {
      "Effect": "Allow",
      "Action": "iot:Connect",
      "Resource": "arn:aws:iot:ap-northeast-2:*:client/rpi-dht22-*"
    },
    {
      "Effect": "Allow",
      "Action": ["iot:Publish", "iot:Receive"],
      "Resource": "arn:aws:iot:ap-northeast-2:*:topic/sensors/dht22/*"
    },
    {
      "Effect": "Allow",
      "Action": "iot:Subscribe",
      "Resource": "arn:aws:iot:ap-northeast-2:*:topicfilter/sensors/dht22/*"
    }
  ]
}
Part 7: Downloading the X.509 Certificates
AWS IoT Core uses mutual TLS authentication — both the device and AWS verify each other's identity using X.509 certificates. During Thing creation, AWS generated and offered four files to download:
- xxxx-certificate.pem.crt — Device certificate (identity)
- xxxx-private.pem.key — Private key (never share this)
- xxxx-public.pem.key — Public key
- AmazonRootCA1.pem — Root CA (verifies AWS's identity)
Critical: The certificates are only shown once at creation time, so the user should download all of them before moving on.
I transferred them to the Pi's certs/ folder from my Mac:
scp ~/Downloads/*.pem.crt kpark30525@kmpark.local:/home/kpark30525/iot-project/certs/
scp ~/Downloads/*.pem.key kpark30525@kmpark.local:/home/kpark30525/iot-project/certs/
scp ~/Downloads/AmazonRootCA1.pem kpark30525@kmpark.local:/home/kpark30525/iot-project/certs/
Part 8: Getting the AWS Endpoint
The endpoint is the AWS IoT Core address your device connects to. I couldn't find it in the Settings UI (AWS had recently moved it), so I retrieved it via the AWS CLI instead:
aws iot describe-endpoint --endpoint-type iot:Data-ATS --region ap-northeast-2
Output:
a1x71u4jsfn1px-ats.iot.ap-northeast-2.amazonaws.com
Part 9: Writing the Main Script
With all the pieces in place, I wrote "sensor_to_aws.py" to read from the DHT22 and publish to AWS IoT Core every 60 seconds:
import time
import json
import board
import adafruit_dht
from awscrt import mqtt
from awsiot import mqtt_connection_builder

ENDPOINT = "a1x71u4jsfn1px-ats.iot.ap-northeast-2.amazonaws.com"
CLIENT_ID = "rpi-dht22-seoul-001"
TOPIC     = "sensors/dht22/data"

CERT_PATH = "/home/kpark30525/iot-project/certs/xxxx-certificate.pem.crt"
KEY_PATH  = "/home/kpark30525/iot-project/certs/xxxx-private.pem.key"
CA_PATH   = "/home/kpark30525/iot-project/certs/AmazonRootCA1.pem"

dhtDevice = adafruit_dht.DHT22(board.D4)

def on_connection_success(connection, callback_data):
    print("Connected to AWS IoT Core!")

def on_connection_failure(connection, callback_data):
    print(f"Connection failed: {callback_data.error}")

mqtt_connection = mqtt_connection_builder.mtls_from_path(
    endpoint=ENDPOINT,
    cert_filepath=CERT_PATH,
    pri_key_filepath=KEY_PATH,
    ca_filepath=CA_PATH,
    client_id=CLIENT_ID,
    clean_session=False,
    keep_alive_secs=30,
    on_connection_success=on_connection_success,
    on_connection_failure=on_connection_failure
)

print("Connecting to AWS IoT Core...")
connect_future = mqtt_connection.connect()
connect_future.result()

try:
    while True:
        try:
            temperature = dhtDevice.temperature
            humidity    = dhtDevice.humidity
            message = {
                "device_id":   CLIENT_ID,
                "timestamp":   int(time.time()),
                "temperature": round(temperature, 2),
                "humidity":    round(humidity, 2)
            }
            mqtt_connection.publish(
                topic=TOPIC,
                payload=json.dumps(message),
                qos=mqtt.QoS.AT_LEAST_ONCE
            )
            print(f"Published: {message}")
        except RuntimeError as e:
            print(f"Sensor error: {e}")
        time.sleep(60)

except KeyboardInterrupt:
    print("Stopping...")
finally:
    mqtt_connection.disconnect()
    dhtDevice.exit()
    print("Disconnected.")
How MQTT/TLS works
The connection uses MQTT over TLS on port 8883. I didn't have to configure the port manually, but the "mtls_from_path()" function from the AWS IoT SDK handles it automatically using the certificates. What enables the secure connection is the combination of:
- X.509 certificates — prove the Pi's identity to AWS
- IoT Policy — grant the device permission to connect and publish
- mtls_from_path() — tells the SDK to use mutual TLS authentication
Testing it
python3 scripts/sensor_to_aws.py
Connecting to AWS IoT Core...
Connected to AWS IoT Core!
Published: {'device_id': 'rpi-dht22-seoul-001', 'timestamp': 1772545137, 'temperature': 22.6, 'humidity': 32.5}
I verified the data was arriving in AWS using the MQTT test client (IoT Core → Test → MQTT test client), subscribing to sensors/dht22/data. Messages appeared in real time. ✅
Part 10: Storing Data in DynamoDB
Seeing data in the MQTT test client is great, but it disappears when the browser is closed. The next step was permanently storing every reading using DynamoDB.
Creating the DynamoDB Table
- Table name: dht22-sensor-data
- Partition key: device_id (String)
- Sort key: timestamp (Number)
- Capacity mode: On-demand (free tier friendly)
Setting Up the IoT Rules Engine
The Rules Engine acts as the bridge between IoT Core and DynamoDB. Every time the Pi publishes a message, the rule automatically triggers and writes it to the database.
I navigated to IoT Core → Message routing → Rules → Create rule:
- Rule name: dht22_to_dynamodb
- SQL statement:
SELECT device_id, timestamp, temperature, humidity FROM 'sensors/dht22/data'
Troubleshooting: DynamoDB vs DynamoDBv2
This is where I hit my first real issue. After setting up the rule using the "DynamoDB" action type, data was being saved, but everything was bundled into a single payload column instead of clean separate columns:
device_id          | timestamp  | payload
rpi-dht22-seoul-001 | 1772547541 | {"temperature": {"N": "22.7"}, "humidity": {"N": "32.3"}, ...}
I tried clearing the "Write message data to this column" field in the DynamoDB action settings, but the payload column kept appearing.
After thought process, I found the problem was the action type.
- DynamoDB (v1) — always bundles the message into a payload column
- DynamoDBv2 — writes each JSON field as a separate, clean column ✅
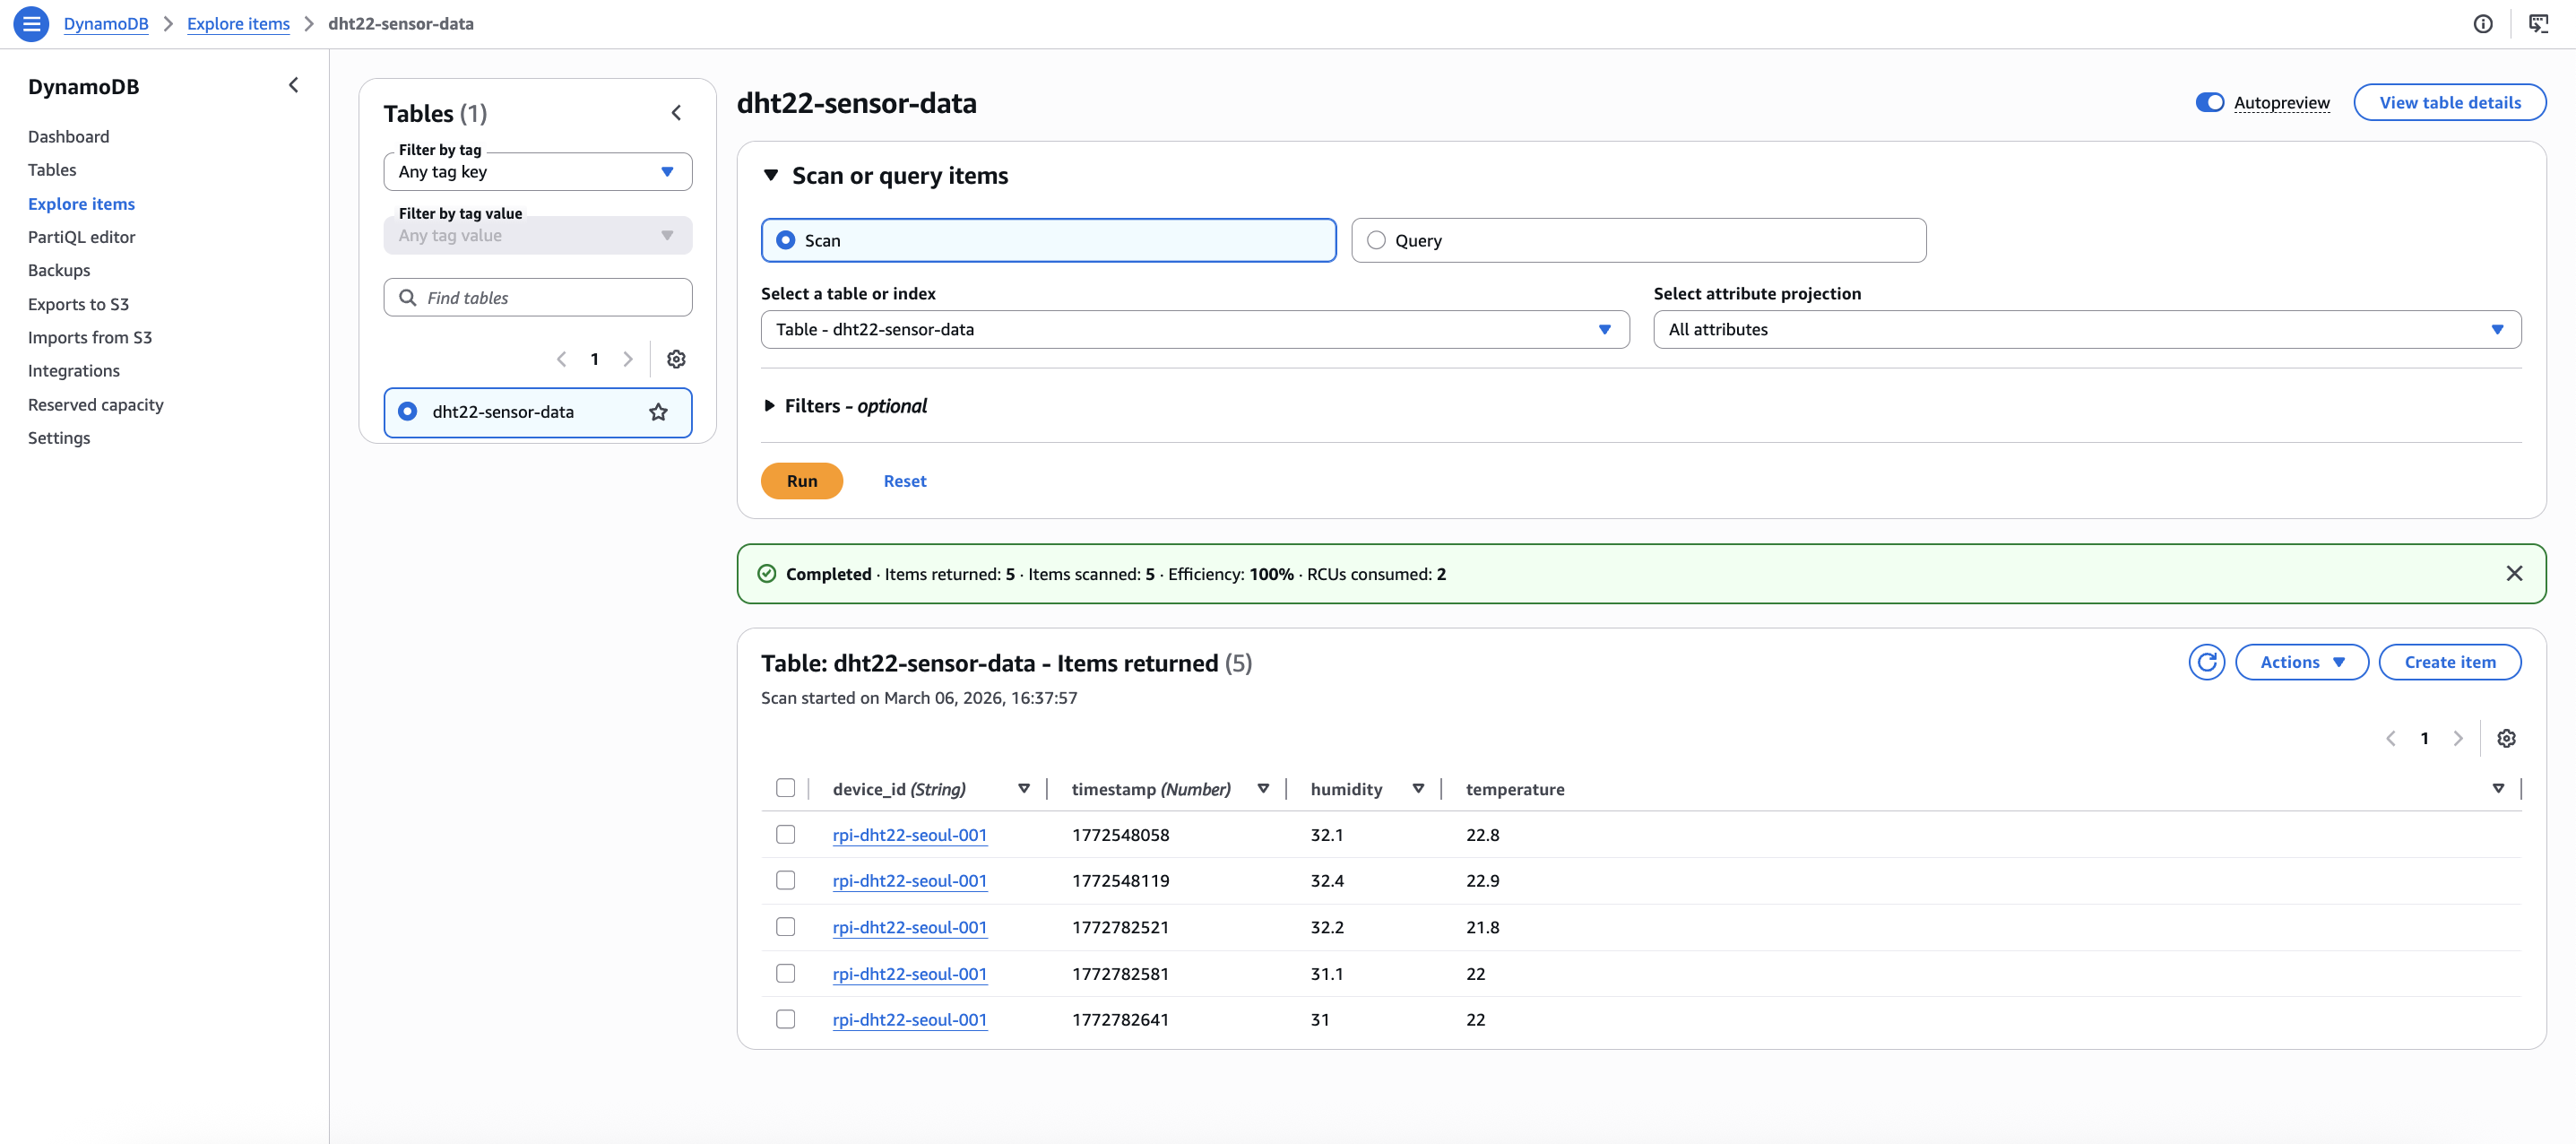
I removed the original action, added a new DynamoDBv2 action instead, and re-tested. The result was exactly what I wanted:
device_id            | timestamp   | humidity | temperature
rpi-dht22-seoul-001  | 1772548058  | 32.1     | 22.8
The data is much more clear and structured.
Final Architecture
DHT22 Sensor (GPIO4)
        ↓
Raspberry Pi 5 — Python script (sensor_to_aws.py)
        ↓ MQTT over TLS / port 8883 / X.509 auth
AWS IoT Core (Thing: rpi-dht22-seoul-001)
        ↓ Rules Engine (DynamoDBv2 action)
DynamoDB (dht22-sensor-data)
├── device_id
├── timestamp
├── temperature
└── humidity
What's Next
The solid pipeline structure is made, so the next step is adding an AI/anomaly detection layer for flagging unusual temperature or humidity readings automatically using AWS Lambda.
Moreover, I will deploy Terraform and utilize IaC. Also, I will use OPC UA and Modbus protocols, using rPi5 as an edge device.
This project is part of my IoT + Cloud portfolio. Full source code available on GitHub.
'[Project] On premise-Edge-Cloud Bridge' 카테고리의 다른 글
| [IoT 프로젝트] #0 OT to IT convergence (0) | 2026.01.14 |
|---|